
IP Office Technical Tip
Tip No: 221
Release Date: 9 October 2009
Region: GLOBAL
![]()
Configuring VPNremote Telephones with Cisco Adaptive Security Appliance (ASA) 5510 using the Adaptive Security Device Manager (ADSM)

The following document assumes that the user/installer is familiar with configuring both IP Office and VPN devices as well as with manually configuring IP Hard-phones. This document details how to create the VPN tunnels required. It is for reference purposes only. It does not provide details on how to configure any other aspect of either device.
Test Systems Software Versions and Basic Telephone Settings
|
IP Office Core Software |
4.2.11 |
|
Cisco ASA Model 5510 |
7.2(4) |
|
Cisco Adaptive Security Device Manager (ADSM) |
5.2(3) |
|
IP Telephone Model |
5610SW, 5620SW |
|
IP Telephone Firmware |
2.3.252 |
|
IP Office IP Address |
192.168.42.5 |
|
TFTP Server |
192.168.42.100 |
|
IP Telephone IP Address |
DHCP |
|
IP Telephone CallSV |
192.168.42.5 |
|
IP Telephone CallSVPort |
1719 [Default] |
|
IP Telephone Router |
DHCP |
|
IP Telephone Mask |
DHCP |
|
IP Telephone FileSv |
192.168.42.100 |
|
IP Telephone 802.1Q |
Auto |
|
IP Telephone VLAN ID |
0 |
Notes
- 1. The IP Telephones may require a Virtual IP Address to be configured in the VPN settings. Please take care in choosing a Virtual IP Address range. Consider where the telephone is most likely to be used and ensure that the Virtual IP Range selected will not conflict. For instance, many VPNremote Telephones may be installed at user’s homes. Typically a Home Router uses 192.168.0.x or 192.168.1.x as its internal network range; therefore it is recommended that this is not used as a Virtual IP Address Range.
- 2. Review the Sample 46vpnsetting.txt file for simplifying configuration settings on the IP Telephones
- 3. While the defaults for Encryption are set at 4500-4500 and these settings do work in most configurations, there may be instances where depending on what the VPN Router and the Home router supports, the user may need to either amend or disable this setting.
IP Office Configuration
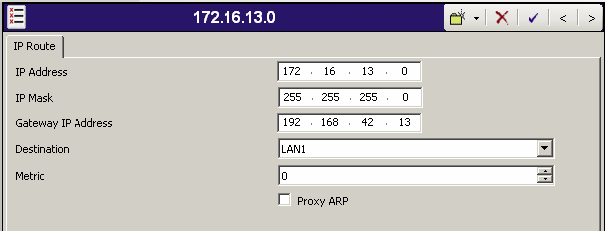
Using IP Office Manager, Open the Configuration and select IP Routes. Add a New IP Route for the Virtual LAN Network to be used in the environment.
Networking Scenario:
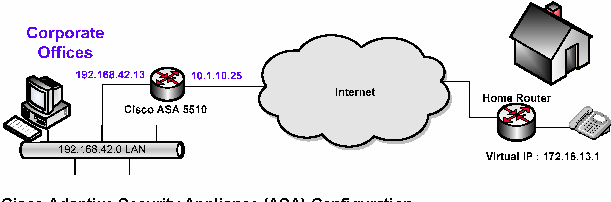
Cisco Adaptive Security Appliance (ASA) Configuration
-
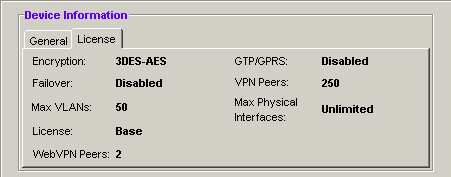
1) From the Adaptive Security Device Manager (ADSM) home screen, select the License tab to identify the IPSec encryption algorithms licensed for use. Encryption algorithms other than DES require the installation of an enhanced encryption license from Cisco.
-
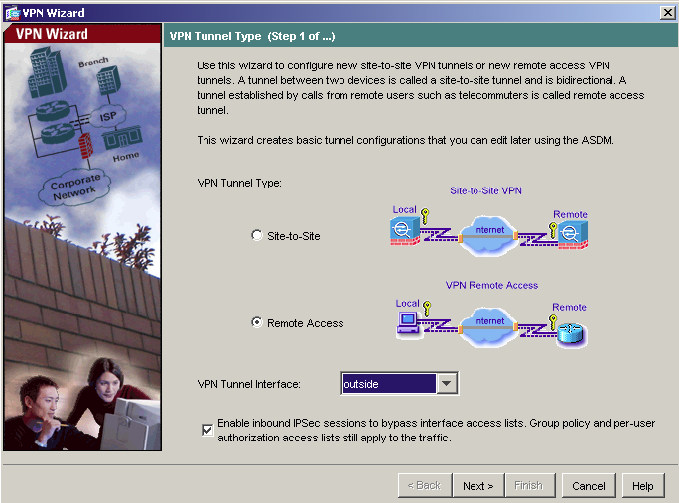
2) Start the VPN Wizard by selecting Wizards>VPN Wizard from the ADSM top toolbar. Select Remote Access for the VPN Tunnel Type and outside for VPN Tunnel Interface. All remaining fields can be left at default values. Click Next to continue.
-
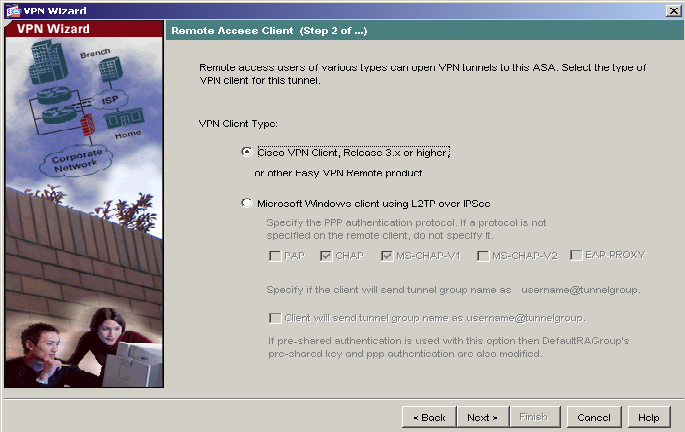
3) Keep the default selection of Cisco VPN Client, Release 3.x or higher, or other VPN Remote Product. Click Next to continue.
-
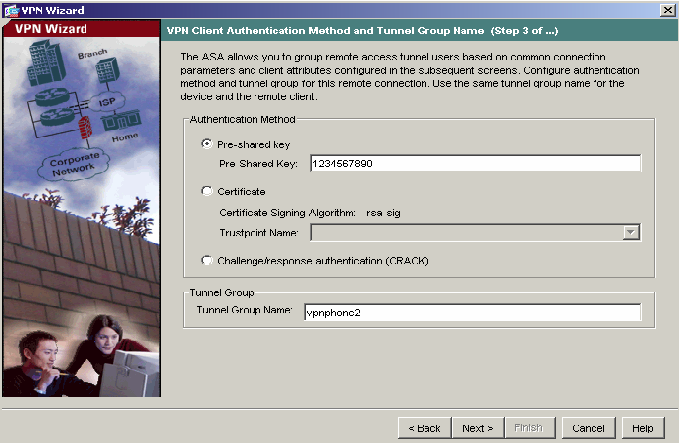
4) Select the Pre-shared Key Authentication Method. Enter your Pre-shared Key and Tunnel Group Name to be used by the Avaya VPNremote Telephones. Click Next to continue.
-
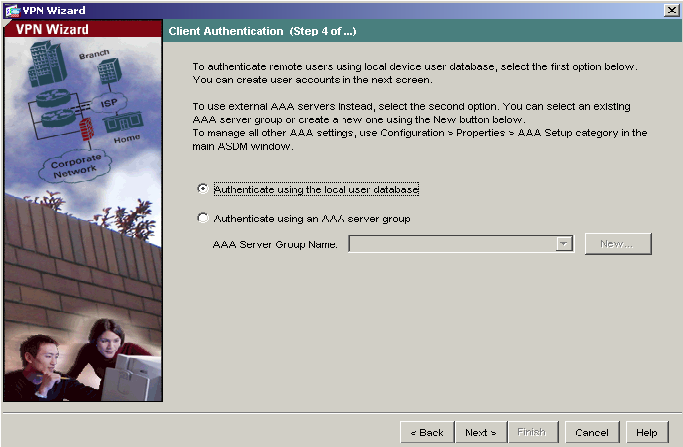
5) The internal ASA user authentication database is used in this document. Select the Authenticate using the local user database and click Next to continue.
-
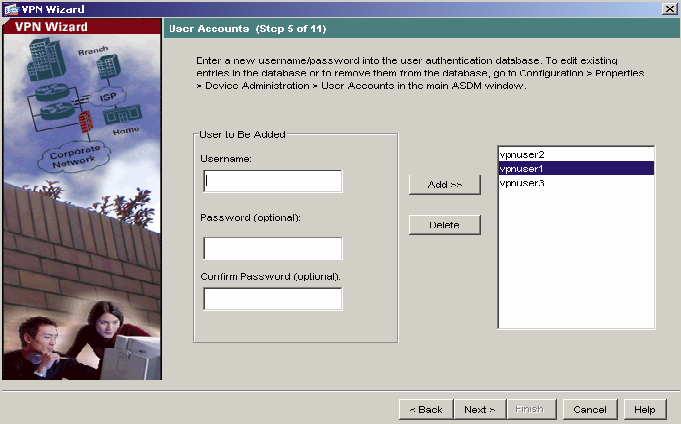
6) The following screen allows you to create user names and passwords for VPNremote Telephone users. vnpuser1, vpnuser2 and vpnuser3 have been created as shown. Click Add to create your users and then click Next to continue.
-
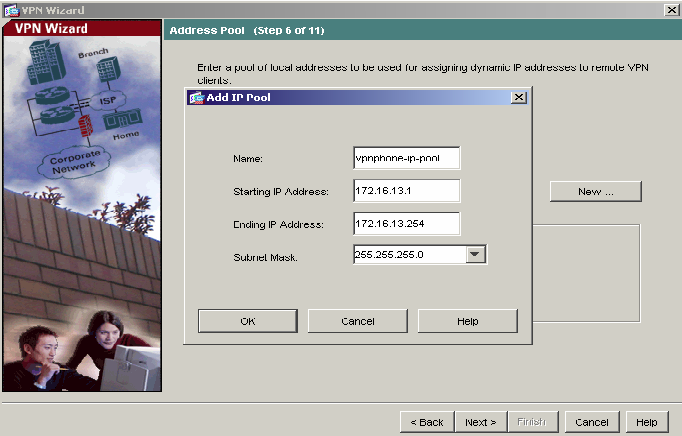
7) Click the New button to create a new IP Address pool. Enter the pool name and the IP Address range to be assigned to VPNremote Telephones as the Virtual IP Address. This address range must not overlap with any addresses on the private enterprise network and must be routable within the enterprise network. Click OK and then click Next to continue.
-
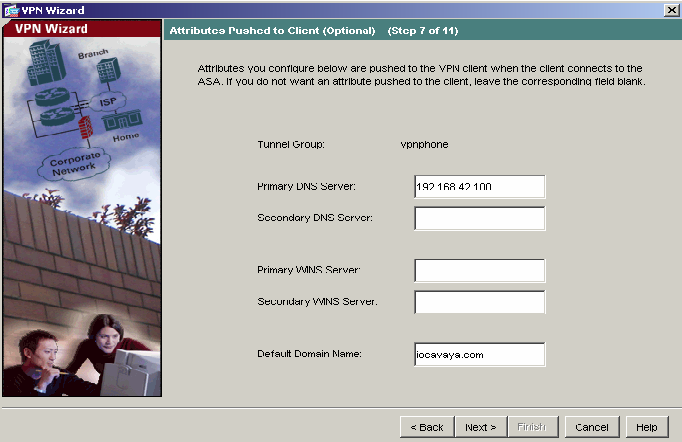
8) Enter the DNS, WINS and Domain information to be used by the VPNremote Telephones. Click Next to continue.
-
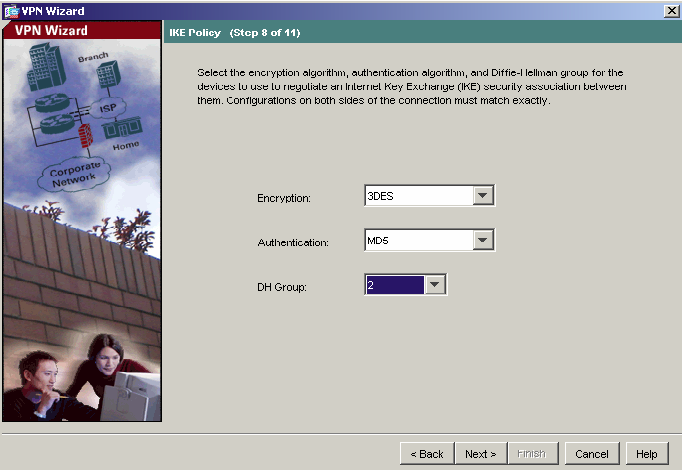
9) Select the IKE security association parameters that you want to use from the drop down lists. Here 3DES, MD5 and 2 are used. Click Next to continue.
-
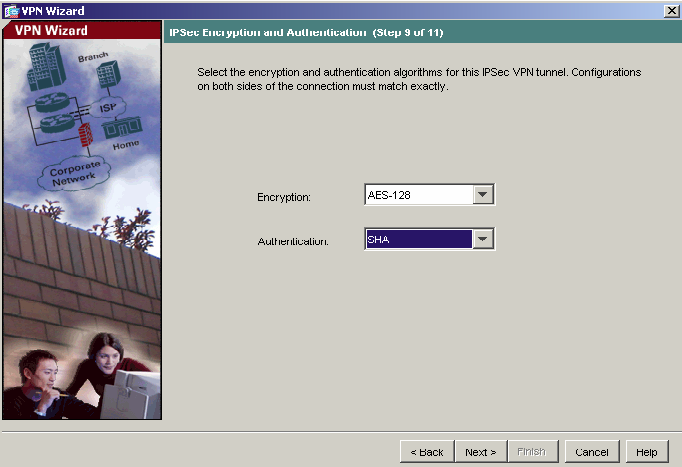
10) Select the IPSec VPN encryption and authentication parameters from the drop-down lists. Here AES-128 and SHA are used. Click Next to continue.
-
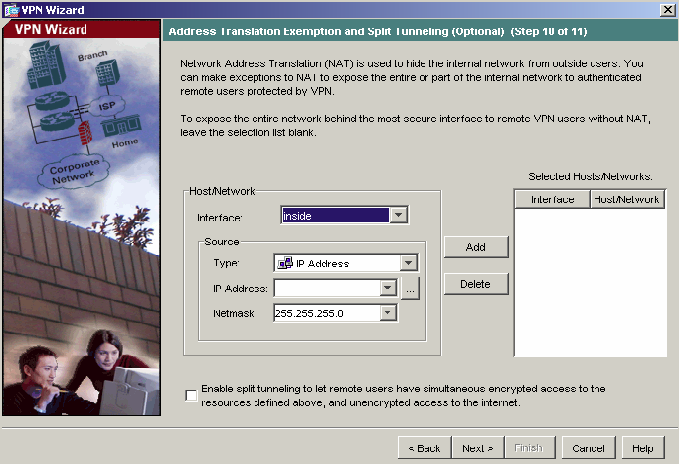
11) Accept the default Address Translation Exemption and Split Tunneling options and click Next to continue.
-
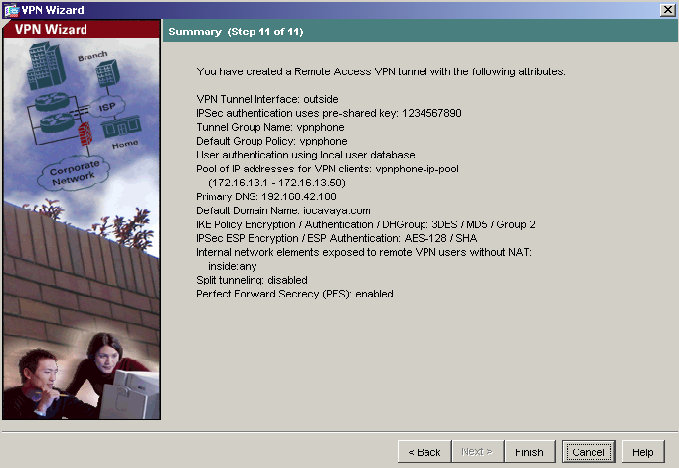
12) Verify the VPN Tunnel options and click Finish to complete.
-
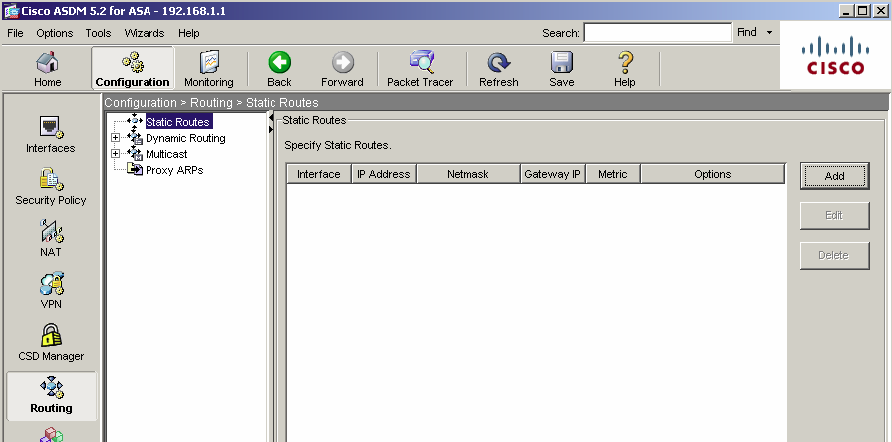
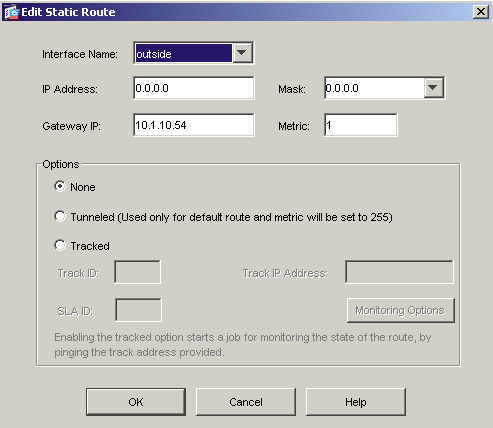
13) Ensure the default route has been set. The default route here is set to the outside (public) interface. Navigate to Configuration>Routing>Static Routes and click the Add button. The IP address of 0.0.0.0 with Mask of 0.0.0.0 signifies the default route. The IP address of 10.1.10.54 is the ISP next hop router. Click OK to continue.
-
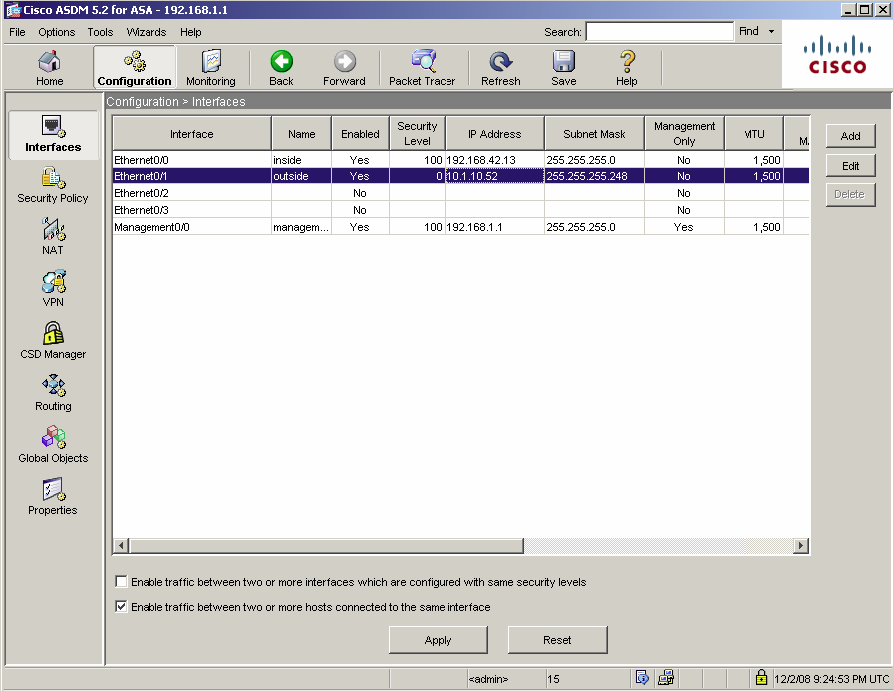
14) If the VPNremote Telephone extensions on the IP Office are configured to allow direct media path, then the following must be done. Navigate to Configuration > Interfaces and tick the Enable traffic between two or more hosts connected to the same interface check box.
VPNremote Telephone Configuration
Below are the parameters to be configured in the VPNremote telephones. Please refer to Technical Tip 205 �" VPN Telephone Deployment Guide for IP Office on how to configure these parameters.
|
Configuration Options |
Value |
Description |
|
VPN Profile |
Cisco Xauth with PSK |
VPN configuration profile |
|
Server |
10.1.10.52 |
IP address of the ASA outside interface |
|
User Name |
vpnuser1 |
User created in the ASDM VPN Wizard |
|
Password |
1234567890 |
Password created in the wizard for the User |
|
Group Name |
vpnphone2 |
Group name created in the wizard |
|
Group PSK |
1234567890 |
Pre-shared key created in the wizard for the Group |
|
|
|
|
|
IKE Parameters |
|
|
|
IKE ID Type |
KEY-ID |
Specifies the format of the Group Name |
|
Diffie Hellman Group |
2 |
Can be set to “Detect” to accept ASA settings |
|
Encryption ALG |
3DES |
Can be set to “Any” to accept ASA settings |
|
Authentication ALG |
MD5 |
Can be set to “Any” to accept ASA settings |
|
IKE Xchange Mode |
Aggressive |
Mode used for Phase 1 negotiations |
|
IKE Config Mode |
Enable |
Enables IKE |
|
Xauth |
Enable |
|
|
Cert Expiry Check |
Disable |
|
|
Cert DN Check |
Disable |
|
|
|
|
|
|
IPSEC Parameters |
|
|
|
Encryption ALG |
AES-128 |
Can be set to “Any” to accept ASA settings |
|
Authentication ALG |
SHA1 |
Can be set to “Any” to accept ASA settings |
|
Diffie Hellman Group |
2 |
Can be set to “Detect” to accept ASA settings |
|
VPN Start Mode |
BOOT |
IPSec tunnel dynamically starts on phone power up |
|
Password Type |
Save in Flash |
Saves password in flash so that user is not prompted at phone boot up |
|
Encapsulation |
4500 �" 4500 |
Default value to enable NAT Traversal |
|
|
|
|
|
Protected Nets |
|
|
|
Virtual IP |
|
|
|
Remote Net #1 |
0.0.0.0/0 |
Access to all private nets |
|
Remote Net #2 |
|
|
|
Remote Net #3 |
|
|
|
Copy TOS |
Yes |
Re-write TOS bit value to outside IP Header for QOS |
|
File Srvr |
192.168.42.100 |
TFTP/HTTP file server |
|
Connectivity Check |
Always |
Frequency of connectivity check |
Issued by:
Avaya SME Customer Product Engineering
Contact details:-