|
During installation it is recommended that the IP Office control unit is started without it being connected to any network. That ensures that the IP Office defaults to a known set of IP address settings. If the IP Office is started connected to a network with a DHCP server, the programming PC will need to be connected to the same network as either a DHCP client or with an IP address valid for that network. This section covers connecting your installation PC directly to the IP Office control unit. Requirements•o IP Office Administration PC •o LAN Cable |
To connect directly to a defaulted IP Office system:
1.The default address for the IP Office control unit LAN port is 192.168.42.1/255.255.255.0. To directly connect a PC, change the TCP/IP properties for the PCs LAN port to the following:
Fixed IP address |
192.168.42.203 |
Subnet mask |
255.255.255.0 |
Default gateway |
192.168.42.1. |
•While setting the PC to be a DHCP client could be used, this is not recommended for performing more advanced functions such as firmware upgrades.
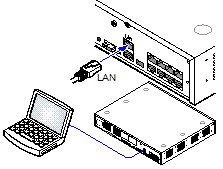
2.Connect the LAN cable from the PCs LAN port to the LAN port on the IP Office control unit.
3.Check that the orange LED lamp on the IP Office LAN port is on. The green LED may also be flickering as it indicates traffic across the LAN connection.
4.To test the connection before running IP Office Manager or System Status Application:
•Right-click on the start icon and select Run. Enter cmd.
•In the command window that appears, enter ping 192.168.42.1. The results should show a number of ping replies from the IP Office. This confirms basic communication between the IP Office Manager PC and the IP Office.
•If there are no ping replies, enter ipconfig. The results should list the IP address settings of the IP Office Manager PC as required above. If they do, enter exit and check the cable connection.
5.You can now start IP Office Manager, System Status or System Monitor.