Having prepared each IP500 base card by adding any trunk daughter card, the base card can be inserted into the control unit.
 Warnings
•Correct anti-static protection steps should be taken while handling circuit boards.
•! IMPORTANT: You Must Switch Off the Control Unit Before Adding, Removing or Swapping Components
Base cards, trunk cards and external expansions modules must only be removed and added to an IP Office system when that system is switched off. Failure to do so will result in the new component not loading the correct firmware and not operating or not operating correctly. This applies even when swapping like for like components.
Tools Required
•o 5mm Flat-blade screwdriver.
•o Anti-static wrist strap and ground point.
Installing an IP500 Card
1.Check that there is no power to the control unit.
2.Using a flat-bladed screwdriver, remove the cover from the slot on the front of the control unit that will be used for each card being installed. This cover is no longer required but should be retained until installation has been completed.
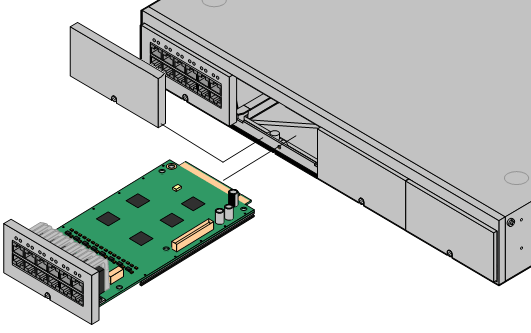
3.Allowing the card to rest against the bottom of the slot, begin sliding it into the control unit. When half inserted, check that the card rails have engaged with the slot edges by trying to gently rotate it. If the card rotates remove it and begin inserting it again.
4.The card should slide in freely until almost fully inserted. At this point apply pressure at the base of the front of the card to complete insertion.
5.Using a flat-bladed screwdriver secure the card.